Yosemite National Park 2-Day Travel Guide – What to See, transportation, best hikes and more
Have a look at our Yosemite National Park 2-day travel guide and discover all the best tips for those visiting, including where to stay and eat, how to get around, what are the best hikes and a detailed list with everything you must see and do in 2 days.
Do you want to receive notifications about new offers?


Established in 1872 in California, Yosemite is considered the oldest national park on the planet, as well as the standard by which all other US reserves are measured. Spanning an impressive area of over 3000 square kilometers, this astounding landscape – once called a true “temple of nature” – is filled to the brim with stunning geological wonders, ranging from waterfalls and scenic viewpoints to glaciers and giant sequoias. Along the way, one cannot miss the park’s huge, awe-inspiring rock faces, a defining feature of Yosemite that has helped cement it as a top destination for climbing enthusiasts.
That being said, we invite you to have a look at our Yosemite National Park 2-day travel guide and discover the best tips for those visiting, including recommendations on hotels and restaurants, transportation and even a detailed list with everything you must see and do in Yosemite National Park in 2 days.
Yosemite National Park 2-Day Travel Guide

How to get to Yosemite National Park – Flights from the UK
Considering just how big the park is, it comes as no surprise that there are several airports located within a 4-hour radius of Yosemite Valley. While the closest international airport can be found in Fresno, the number of connections is relatively limited, which is why it’s much easier (and cheaper) to fly into San Francisco International Airport.
As such, if you’re traveling from the UK, it is possible to fly directly to San Francisco from London–Heathrow (British Airways, United Airlines and Virgin Atlantic).
How many days do I need to visit Yosemite National Park?
Just like most US national parks, Yosemite is just such a vast, expansive space that you could easily spend weeks hiking trails and taking in the views. However, we understand most of us have limited vacation time, so prioritizing what to see and do is essential.
With that in mind, for Yosemite National Park specifically, a stay of 2 to 3 days is recommended to explore its main attractions before heading off to other nearby destinations, such as Sequoia National Forest, Death Valley, or the cities of San Francisco, Las Vegas and Los Angeles.
Yosemite National Park 2-Day – Best time to visit the city

While Yosemite National Park is popular year-round, it’s best to avoid winter and early spring, as heavy snowfall can lead to trail and road closures. On the other hand, peak summer presents the opposite challenge, with scorching heat and overwhelming crowds making your visit far less enjoyable. Additionally, the already absurd accommodation prices can feel almost extortionate during the high season.
That being said, for the best experience, the ideal time to visit Yosemite National Park is during the shoulder-season, in spring (mid-April to early June) and fall (mid-September to late October).
Documents needed for your trip to Yosemite National Park
Considering this is a non-European destination and lacks any agreements with the EU for alternative forms of identification, it’s an absolute must to have your passport ready if you plan to visit the United States of America. Your passport should also have a validity of at least 6 months beyond your intended date of entry.
Now, here’s the good news for EU/British citizens – you won’t need a tourist visa, meaning you can enjoy a stay of up to 90 days with just a stamp in your passport.
However, visitors still need to sort out the ESTA (Electronic System for Travel Authorization), an online form where you have to share personal details and answer a few questions about your intentions and travel history. Typically, applications are processed within a few hours, but it’s a good idea to apply at least 3 days before your estimated day of arrival. It costs 21,00$ (17,00$ for the travel authorization + 4,00$ processing fee) and it’s valid for 2 years.
Yosemite National Park 2-day travel guide – Internet and SIM Cards
Since there is no special agreement in place between the UK and the US regarding international communications and roaming fees, using your regular phone plan is a big no-no!
That being said, our advice is to get yourself a SIM card once you touch down in San Francisco. However, and here’s the crucial part: DO NOT BUY ONE AT THE AIRPORT! The reason being that none of the American mobile carriers have physical stores at the airport. Inside its premises, your only options will be a generic phone stand or vending machines (yes, like the ones for snacks). The problem here is that SIM cards are ridiculously overpriced on both these alternatives, with 1GB of mobile data easily costing around 30,00$. Plus, if you go for the vending machines, you’ll need to handle the subscription and activation of your selected plan yourself, and the instructions might not be all that clear.
Considering all these factors, it’s a better idea to head to the city center and visit one of the physical stores of the major telecommunications providers in the country. However, just a heads-up, the prepaid SIM card market in the USA isn’t as diverse as what you find in Europe, since there are only two companies selling this type of product in the entire country: T-Mobile and AT&T.
Yosemite National Park 2-day travel guide – T-Mobile SIM Card
- 10GB Plan
- Price: 40,00$
- Mobile Data: 10GB
- Duration: 30 days
- Texts and calls for US numbers: Unlimited
- Unlimited Plan
- Price: 50,00$
- Mobile Data: Unlimited
- Duration: 30 days
- Texts and calls for US numbers: Unlimited
Yosemite National Park 2-day travel guide – AT&T SIM Card
- AT&T Prepaid 5GB Plan
- Price: 30,00$
- Mobile Data: 5GB
- Duration: 30 days
- Texts and calls for US numbers: Unlimited
- AT&T Prepaid Unlimited Plan
- Price: 65,00$
- Mobile Data: Unlimited
- Duration: 30 days
- Texts and calls for US numbers: Unlimited
NOTE 1: Both companies technically have an activation fee of 10,00$ and 15,00$, respectively. However, this fee is waived for customers who buy any of these packages.
NOTE 2: Just like pretty much everything else in the US, these prices do not include taxes. For California, the sales tax hovers at around 7,25%, though it can vary according to the city district and the type of product/service.
Yosemite National Park 2-day travel guide – eSIM Card from Airalo
Unlike most countries, the US stands out as one of the places where investing in an eSIM card can actually make sense from a budget perspective. Given that the options for 5GB and 10GB are noticeably pricey, and it’s likely you won’t require unlimited mobile data or extensive minutes/SMS for American numbers, you can save both time and money by going the digital route.
Here are a few of the eSIM options provided by Airalo:
- 5GB | 30 days | $16.00*
- 10GB | 30 days | $26.00*
- 20GB | 30 days | $42.00*
*These are the final prices, inclusive of taxes.
If you’re unsure about the process of buying and activating a digital SIM card, we recommend checking out our article on the topic.
Yosemite National Park 2-day travel guide – Withdrawals, banking fees and travel budget

With the US Dollar (USD – $) as the country’s official currency, any withdrawal using a UK bank card might incur in the payment of several different fees. Besides the percentual fee referring to the currency conversion, some UK banks may also charge a flat commission for withdrawals made outside the UK. In some instances, you may well end up paying 5%-6% of your original withdrawal in banking fees.
On the other hand, exchanging money before your trip is not a viable solution either. Besides not being any cheaper, it’s also not safe or wise to carry so much money on you during your trip. As such, we recommend using the services of online banking fintech companies such as Revolut, N26 or Monzo.
Although each have their own limitations and fees, they allow you to withdraw a certain amount in foreign currency without any fees involved. And even after that threshold is reached, costs are much smaller when compared to traditional banks.
It’s also worth mentioning that electronic payments have become the standard all over the US, so the need to withdraw cash is becoming increasingly less common. However, in case you do find yourself needing to do so, almost all banks charge a fee for using a foreign card, which can range from a modest 1,00$ to a hefty 7,00$ per withdrawal. So, it’s a good idea to withdraw as much as possible each time to avoid unnecessary additional fees.
On the other hand, if you prefer to have some cash on hand, we recommend exchanging your money for dollars back at home. Due to the high demand for the currency, the rates offered by currency exchange offices don’t usually shy too much away from the official market rates (especially when compared to other currencies). Additionally, given the prevalence of the dollar, you could even contact your bank to inquire about the possibility of doing the money exchange through them. In these cases, the rate is often even better.
Yosemite National Park 2-day travel guide – Safety, scams and frauds

Since this is a nature-focused destination, safety recommendations mainly revolve around the surrounding environment rather than scams or fraudulent schemes. Therefore, start off by planning your visit carefully, consulting the park’s official website to get information on weather conditions, trail closures and other safety alerts. Be sure to bring a physical map and not rely solely on your phone, as signal coverage can be weak or nonexistent in remote areas, and your battery may run out. During your visit, always stay on designated trails, avoiding steep slopes, loose rocks and unstable surfaces. Keep in mind that Yosemite is home to thousands of wild animals, so wildlife encounters are natural and part of the experience. As such, it is essential to keep a safe distance from any animals you come across and never feed them. Since bears inhabit the park, properly storing all food in secure, sealed containers is highly recommended.
As you’ll be spending your days hiking, staying hydrated is crucial. Carry plenty of water, especially in the hot, dry summer months, and always keep snacks on hand, such as protein bars, nuts, fruit or canned tuna. For minor injuries or accidents, having a basic first aid kit with essentials like bandages, pain relievers, rubbing alcohol, gauze and wraps can be helpful as well. If you’re traveling solo, make sure to let someone of trust know about your planned route and expected return time so they can alert authorities if needed. Finally, though it goes without saying, always respect park rules and regulations by following signs and ranger instructions, and help preserve the reserve by leaving no trace behind, including trash, personal belongings or food waste.
Where to sleep in Yosemite National Park – Hotels and Accommodation

If you’re looking out for a place to stay on our Yosemite National Park 2-day travel guide then we got your covered!
Actually, first you have to choose weather you prefer to stay inside the national park proper, as there 13 campsites and 7 places of accommodation within the valley area. Among those, you can have your pick between camping tents, shared rooms, glamping and more luxurious hotel rooms. However, the convenience of staying inside the park comes at a cost, with room fares absurdly inflated for those wishing to sleep in the valley.
Alternatively, you can stay in one of the small towns located near the park’s 6 official entrances, with Oakhurst, El Portal and Groveland standing out as the best options. While it’s true you won’t be at the heart of it all, you’ll still be relatively close… and it won’t cost you an arm and a leg!
That being said, here are a few hotel options which have passed our value-for-money test.
Hotels in the Yosemite Valley (inside the park)
- € – Curry Village
- €€ – Yosemite Valley Lodge
- €€€ – Ox Yoke
- €€€€ – The Ahwahnee
Hotels in Oakhurst
- € – Queen’s Inn By The River
- €€ – Yosemite Southgate Hotel & Suites
- €€€ – Best Western Plus Yosemite Gateway Inn
- €€€€ – Fairfield Inn & Suites by Marriott Oakhurst Yosemite
Hotels in Groveland
- € – Yosemite International Hostel
- €€ – Yosemite Westgate Lodge
- €€€ – Yosemite Rose Bed and Breakfast
- €€€€ – Firefall Ranch Yosemite
Transportation between San Francisco Airport and Yosemite National Park

Despite being the busiest international air hub (relatively) near Yosemite, San Francisco Airport is still about 4 hours away from the national park, so planning ahead how to move between the two is paramount. That being said, you’ll be better off by renting a car – not just for this specific route, but rather for your entire adventure. As per usual, you can rent your vehicle online beforehand (we recommend Rentalcars.com) and pick it up upon arrival in San Francisco.
Sadly, if you don’t feel too comfortable renting a car, the alternative can be quite tiring and time-consuming. Either way, let’s get to it! First off, you’ll need to figure out to get to Downtown San Francisco. Fortunately, the airport is served by BART, a local railway system passengers can take to head to the city center. In your case, you’ll take BART’s yellow line and get off in Montgomery, next to the San Francisco Bus Terminal. This trip will take 30 minutes and cost $11,15. Tickets can be bought at the automatic machines or through Clipper (you’ll use your phone as a ticket). Once you make it to the station, you’ll hop on a bus to Merced. Currently, the route is only served by Greyhound, with a single daily departure at 11h35. The journey takes 3h35 and tickets are available from the company’s website for $24,00.
Finally, in Merced, just take a YARTS bus to Yosemite National Park. In this case, you’ll be looking for route HWY 140 (blue), which drop you off at the Yosemite Valley Visitor Center after making stops in Mariposa, Midpines and El Portal. In the Summer, there are 7 daily connections for the 90-minute drive from Merced to Yosemite (running from 04h45 to 16h25). Ticket costs $22,00 and it’s highly recommended to book them online a few weeks in advance. Once you add everything up, and factoring in waiting/transfer times, it will take you almost 8 hours to get to Yosemite National Park with public transportation from the airport. And that’s assuming you’ll be able to catch the daily bus from San Francisco to Merced at 11h35 (otherwise, you’ll have to spend the night in the city). Furthermore, you’ll spend $57,15 on tickets alone.
Yosemite National Park 2-Day Travel Guide – How to get around

As you’ve probably gathered from the detailed instructions on how to go from the airport to the national park, public transportation leaves a lot to be desired. Unlike Europe, where collective transport is deemed essential, in the US everything was built with road traffic in mind, leading to far less efficient public transportation systems in its major cities (let alone rural/natural areas).
Luckily, in the specific case of Yosemite, the park’s authority has put together two different free shuttle services linking the main tourist attractions within the valley.
Renting a car in Yosemite National Park

A rule of thumb for almost any destination in the US – except for major cities – renting a car is usually the best way to explore and get around. Naturally, Yosemite National Park is no exception! When it comes to convenience and flexibility, having your own vehicle makes all the difference.
Upon arriving at San Francisco Airport, you’ll find several rental agencies offering all types of cars. However, we strongly recommend arranging your rental well in advance in platforms like Rentalcars.com, where you can compare prices and availability before your trip. Additionally, and before making any decision based purely on personal preference or budget, it’s important to consider the park’s terrain, as well as your experience driving that type of car. As always, it’s best practice to carefully check online reviews, read all documents thoroughly before signing and document the car’s condition beforehand (with photos and videos). After all, we know very well how this industry operates! On the bright side, you won’t need an International Driving Permit to rent a car in the US, as both the UK and Ireland and the US have a mutual agreement recognizing each other’s standard driving licenses.
Keep in mind that the entrance fee to Yosemite National Park varies depending on whether you are bringing a car in or not (more details in the ticket section below). Additionally, during peak seasons – when reservations are required for entry (explained later) – you’ll need to add a vehicle to your booking. Make sure to refuel whenever possible, since there are no gas stations inside Yosemite Valley! If you need fuel, you’ll find 24/7 gas stations in Wawona, El Portal, Crane Flat and Tuolumne Meadows.
Lastly, if you’re visiting in winter, it’s very likely that you’ll come across expect snowy roads and potentially harsh weather conditions. That said, be sure to use appropriate tires and know how to install and remove snow chains. Better safe than sorry!
Free shuttles in Yosemite National Park

While renting a car is the most convenient way to explore the park, it’s not essential to make the most of your visit to Yosemite. To make things easier for visitors, the park’s management offers several free shuttle services that transport passengers between the main points of landmarks across Yosemite Valley.
Currently, there are two main shuttles: the Valleywide Shuttle (Green Route) and the East Valley Shuttle (Purple Route). The former covers the entire Yosemite Valley, stopping at famous sites like El Capitan, Cathedral Beach and Yosemite Falls, but also at hotels, restaurants and campsites. This shuttle runs daily from 07h00 to 10h00, with a new bus leaving every 12 to 22 minutes. As for the East Valley Shuttle, it only runs along the course that goes through the valley’s hotels, campsites, restaurants and parking areas, linking them to the Welcome Center.
In addition to these year-round shuttles, there are also seasonal services that help visitors get to areas outside Yosemite Valley. One of these is the Mariposa Grove Shuttle, which takes passengers to – you’ve guessed it – Mariposa Grove, home to the largest concentration of giant sequoias in Yosemite. These shuttles depart from the Mariposa Grove Welcome Plaza, near the park’s South Entrance, operating from May to November. They leave every 15 minutes between 07h00 and 19h00. In fact, and even if you’ve rented a car, personal vehicles are not allowed anywhere near the grove (the nearest parking lot is over 3 km away from the entrance), making the shuttle the best option for all visitors.
Another seasonal service is the Tuolumne Meadows Shuttle, which runs between Tuolumne Meadows Lodge and Olmstead Point, stopping along the way at Tenaya Lake and at the starting point of several different hiking trails. This shuttle operates from mid-June to mid-September, departing every 30 minutes between 07h00 and 19h00. Unlike the other services, this is not a free shuttle. Daily passes cost $10,00.
YARTS Buses

Finally, for those without a car who are staying outside the park, figuring out the best way to reach Yosemite is essential. That’s where YARTS buses come in, a paid shuttle service operated by the park authority, designed to connect nearby cities to the Yosemite Valley Visitor Center.
Currently, YARTS operates four routes:
- Route HWY 140 (Blue): Stops in Merced, Mariposa, Midpines and El Portal. Check the schedule here. Price from El Portal: $8,00.
- Route HWY 120 (Red): Stops in Sonora, Jamestown, Groveland and Buck Meadows. Check the schedule here. Price from Groveland: $14,00.
- Route HWY 395 (Green): Stops in Mammoth Lakes, June Lake, Lee Vining, Tuolumne Meadows and White Wolf. Check the schedule here. Price from Lee Vining: $22,00.
- Route HWY 41 (Yellow): Stops in Fresno, Coarsegold, Oakhurst, Fish Camp and Mariposa Grove. Check the schedule here. Price from Oakhurst: $14,00.
Looking at the options above, the Blue, Red and Yellow routes are the best choices for those wishing to explore Yosemite Valley, so as long as you’re staying in El Portal, Groveland or Oakhurst, respectively. The Green route is best suited for visitors wanting to explore the eastern side of the park, especially Tuolumne Meadows.
America the Beautiful Pass – Tickets for Yosemite National Park

Although Yosemite is a vast outdoor destination, a ticket is still required to enter through one of the park’s six official entrances. Currently, the entry fee is $20,00 per person and the ticket is valid for three days. However, if you’re driving, the fee is $35,00 per vehicle, covering all passengers. This means that whether you’re alone, with a partner, or in a group, the total cost remains $35,00 per car. Tickets can be purchased at any official entrance using a credit or debit card (cash is not accepted).
That said, the best value for money is undoubtedly the America the Beautiful Pass, an annual pass that grants access to over 2000 paid recreational areas in the US, including its vast collection of National Parks. Naturally, Yosemite is included in this list. For just $80,00, you can visit all the included sites for one year, counting from the date of purchase. Just like a regular ticket, the pass covers all passengers in a single vehicle as well. Essentially, if you plan to visit at least three different national parks (considering each charges $35,00 per car), you’re already saving money off the pass. Plus, you’ll have an entire year to return to the US and explore other parks. Besides Yosemite, the pass includes other iconic national parks such as Grand Canyon, Glacier, Yellowstone and Zion, among many others! You can purchase your pass in person at any of these locations or online (link above). However, even if you buy the digital version, keep in mind you must still present a physical copy of the pass, meaning you’ll need to pick it up at a designated location or have it shipped to your home (shipping fees apply). For this reason, we recommend purchasing your pass a few weeks in advance.
Regardless of whether you choose the America the Beautiful Pass or a standard entry ticket, you can’t just show up at the entrance and expect to get in. Well, technically you can, but only in specific circumstances. Let’s break it down. To deal with the overwhelming post-pandemic visitor surge and manage park resources more efficiently, Yosemite now requires advance reservations during peak periods, allowing the park authority to better control the daily visitor count and prevent overcrowding. That said, reservations are required to everyone visiting the park from 05h00 to 16h00 from July 1 to August 16, as well as on weekends and holidays between the 10th and the 25th of February, the 13th of April and the 30th of June, and the 17th of August and the 27th of October (during the same timeframe). To enter without a reservation, you must visit in other dates or arrive before 05h00 or after 16h00. You can make your reservation online here for just a $2,00. Needless to say, this does not include the admission ticket or pass. Just like the ticket system, reservations are made per person or per vehicle (one reservation per car, regardless of the number of passengers).
IMPORTANT: If you’re staying overnight at one of Yosemite’s lodges or campsites, you don’t need a reservation, regardless of your visit date/time. The same applies to everyone arriving at the park in a YARTS bus.
Best 1-day hikes in Yosemite National Park

Yosemite Falls Trail: Possibly the most popular day hike in the park, this 11 km (round-trip) trail takes you to the top of Yosemite Falls. The views are unbeatable, with the waterfall right under your nose and Yosemite Valley stretching spectacularly as far as the eye can see.
Half Dome Trail: While the aforementioned trail is the most famous, this hike to the top of one of the park’s most iconic rock formations is without a doubt the most daring. In fact, there are so many people wishing to cross this one off their bucket list that hikers must apply for a permit to access the trail. On average, only 25% of applicants get approved. Good luck!
Snow Creek Trail: Another challenging hike, this 15 km round-trip trail comes with a steep 800-meter elevation gain. Great effort brings great rewards, though, as the final viewpoint offers one of the most breathtaking panoramas in the whole park.
Four Mile Trail: Ending at the famous Glacier Point, this trail was made for people with a penchant for sadistic self-hate. While hiking is the only way to get to the other places on this list, in this case there’s actually a shuttle bus that can take you to the top. Nonetheless, many still choose to tackle the demanding 7.5 km (each way) trek instead!
Sentinel Dome: Now that we’ve covered the more demanding hikes, it’s time to highlight some easier options. Among those, the Sentinel Dome is probably the trail with best effort-to-reward ratio in the entire park, offering incredible views with minimal effort. It only takes 3.5 km – not bad!
Mirror Lake Trail: This trail provides one of the best views of the Half Dome, right from the shores of Mirror Lake. There are two variations: a shorter 3 km version that ends at the lake; and a longer 8 km version that continues into Tenaya Canyon.
Bridalveil Fall Trail: Can this even be called a trail? At just 800 meters long, probably not. Be that as it may, the marked hike will lead you to the base of Bridalveil Fall, one of the most popular attractions in Yosemite.
Eating in Yosemite National Park – Restaurants, supermarkets and take-away

Best restaurants in Yosemite Valley (inside the park)
- The Mountain Room (varied)
- Bar 1899 (varied)
- Wawona Hotel Dining Room (varied)
- The Ahwahnee Bar (varied)
- The Ahwahnee Dining Room (buffet)
- Curry Village Pizza Deck (pizza)
- Taqueria at Meadow Grill (tacos)
- Degnan’s Deli (sandwiches)
- Curry Village Coffee Corner (coffee and breakfast)
- Village Store (supermarket)
Best restaurants in Oakhurst
- Plazuelas (Mexican)
- El Cid (Mexican)
- Tandoori Express (Indian)
- Pete’s Place (Greek)
- China Delight (Chinese)
- Oakhurst Grill & Whiskey 41 Lounge (varied)
- Round Table Pizza (pizza)
- Clouds Rest Coffee (toasts, burritos and waffles)
- Judy’s Donuts (donuts/bakery)
- Vons (supermarket)
Best restaurants in Groveland
- Cocina Michoacana (Mexican)
- Iron Door Saloon (varied)
- Artisan Taproom (varied)
- The Grill at Pine Mountain Lake (varied)
- Pizza Factory (pizza)
- Around The Horn Brewing Company and Restaurant (beerhouse)
- Kevin and Randi’s Old Fashioned Meat Market (sandwiches)
- Tangled Hearts Bakery (breakfast)
Yosemite National Park 2-Day Travel Guide – What to See and Do in 48 Hours
As mentioned above, 2 days is just the perfect amount of time to experience the very best Yosemite has to offer if you keep up the pace! That said, and with a full 48 hours in the national park, you can see the majestic Yosemite Falls, witness the grandeur of the massive rock faces El Capitan and Half Dome, climb up to the famous Glacier Point, check out Tunnel View and photograph the giant sequoias at Mariposa Grove. It might be a bit packed, but it’s entirely doable!
Without further ado, here’s what to see and do in Yosemite National Park in 3 days:
Yosemite National Park 2-Day Travel Guide: Day 1 – Tunnel View, El Capitan and Yosemite Falls

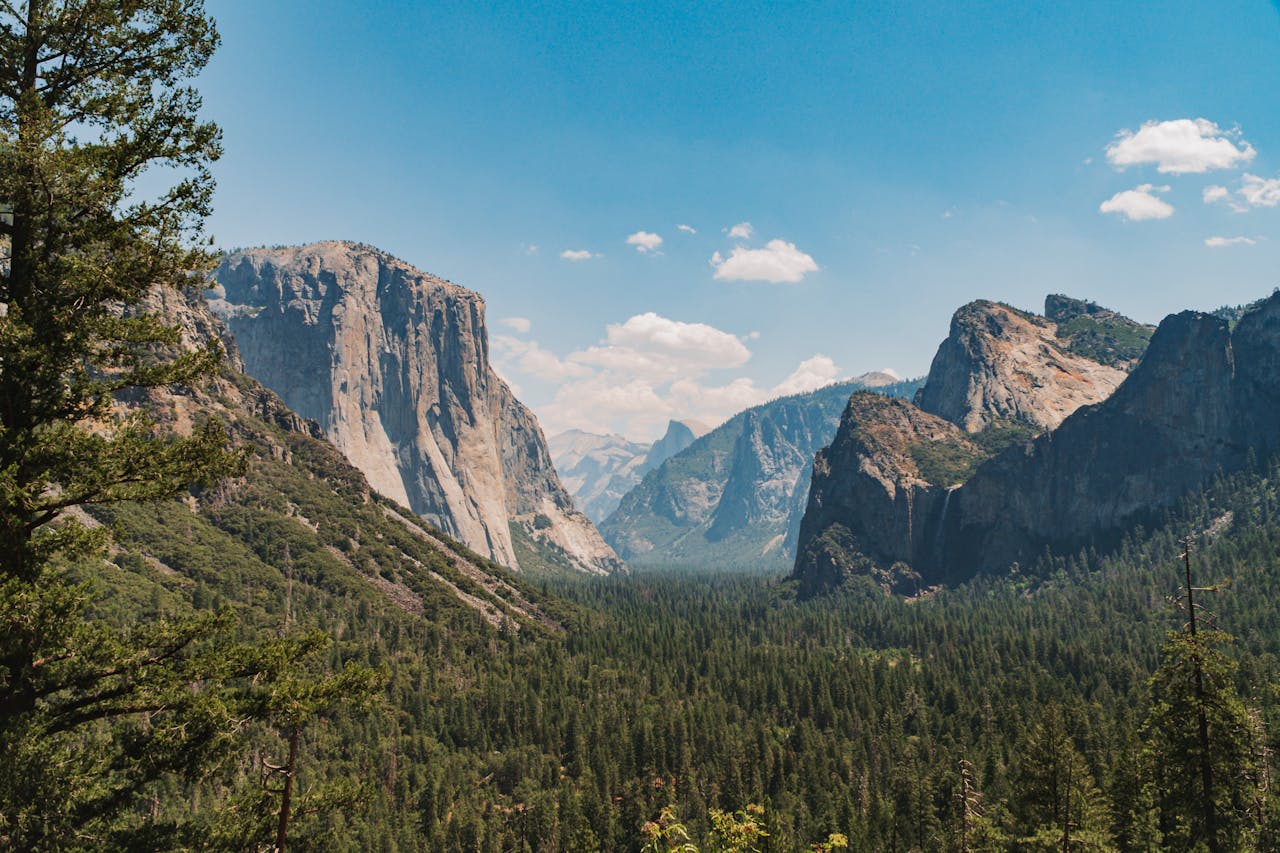
Welcome to one of the most iconic and breathtaking national parks in all of America! Famous worldwide for its appearances in movies, TV shows and virtually every form of pop culture you can think of, Yosemite National Park is a must-visit destination in the US! As we’ve mentioned, you could easily spend a whole week just exploring the different areas of the park (and even that wouldn’t be enough), but with two days, you can at least get to know the major highlights. That being said, your first stop will take place at the iconic Tunnel View, the most photographed viewpoint in all of Yosemite. Offering a privileged panorama of Yosemite Valley, formed by the likes of El Capitan, Half Dome and Bridalveil Fall, this one of the most recognizable images of the American West Coast. Luckily, some of these landmarks will actually be part of your itinerary for the rest of the day, allowing you to experience up close what you first admired from a distance. One such spot is Bridalveil Fall, a waterfall where you’ll find one of the easiest and most accessible hikes in the park. Well, with its absurdly short 800 meters, it can hardly be called a trail, but it’s definitely worth taking a few minutes to walk to the base of the waterfall.

One particular fact you might not be aware of, Yosemite is considered a premier destination for rock climbing enthusiasts. This is due to the park’s massive rock faces, which are relatively flat and attract climbers from all over the world. One of the most iconic of these is El Capitan, the colossal granite monolith that is now one of the park’s most recognizable symbols. Even if you don’t plan on climbing (which is likely), just seeing this giant up close is impressive enough. Plus, you might catch a glimpse of some climbers making their ascent – an incredible feat of endurance and skill. Finally, your day will come to an end at Yosemite Falls, considered by many to be the park’s top attraction. Even though it’s the last stop of the day, we recommend arriving in the morning so you’ll have time to complete the park’s most popular 1-day hike – an 11-kilometer round-trip trek leading to the top of the famous falls. The views are unbeatable, with the waterfall right under your nose and Yosemite Valley stretching spectacularly as far as the eye can see.

First day wrap-up:
- Tunnel View
- Bridalveil Fall
- El Capitan
- Yosemite Falls
Yosemite National Park 2-Day Travel Guide: Day 2 – Half Dome, Glacier Point and Mariposa Grove

And just like that, your Yosemite adventure is coming to an end! But before you say goodbye to this incredible natural wonder, there are still a few must-see spots left on your itinerary. To start the morning with something a little less obvious, you’ll head to the impressive Mariposa Grove, located at the southern edge of the park. This area is famous for its towering sequoias, the tallest trees on Earth. In fact, walking along one of the trails here feels like wandering among giants, with some of these ancient trees reaching an astonishing 90 meters in height and 8 meters in diameter. Even if you have a rental car, personal vehicles are not allowed in the grove (the nearest parking lot is over 3 kilometers away from the entrance), which is why we recommend taking the Mariposa Grove Shuttle. These buses take passengers to the grove and depart from the Mariposa Grove Welcome Plaza near the South Entrance, operating from May to November, between 07h00 and 19h00 (in 15-minute intervals).

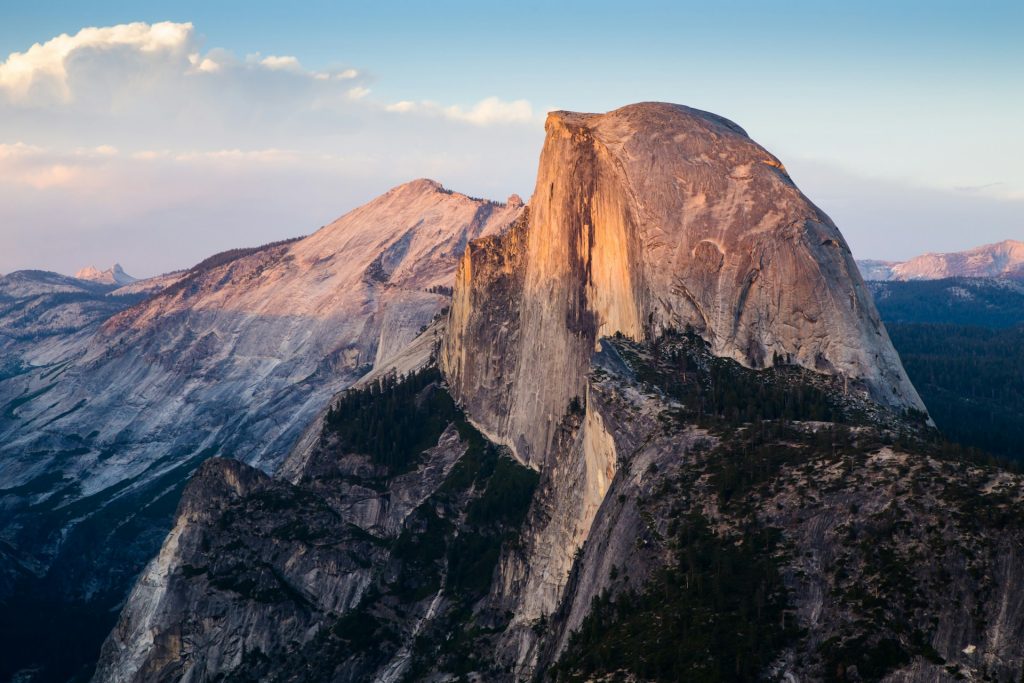
After admiring the mighty sequoias, you’ll hop back in the car and drive to Yosemite Valley for two final must-see stops. The first is the breathtaking Glacier Point, arguably the only viewpoint able to go neck-to-neck with Tunnel View. As expected, the views are absolutely jaw-dropping! Besides, the site is also a gateway to several popular hiking trails, and if you’re up for it, we highly recommend the Sentinel Dome trek. Probably the trail with best effort-to-reward ratio in the entire park, it offers incredible views with minimal effort. Just 3.5 km long – not bad! Finally, your Yosemite journey will come to an end with a visit to the legendary Half Dome, the other towering rock formation that – alongside El Capitan – has cemented the park’s legendary status in the climbing world. Interestingly, even amateurs can hike to the top of Half Dome, though be warned that this is no easy feat! Nothing that seems to deter adventurers, though, as there are so many people wanting to complete the climb that visitors must apply for a permit to access the trail. On average, only 25% of applicants get approved. If you’re one of the lucky ones, you can forget everything else and dedicate the entire day to conquering Half Dome. I promise you won’t have the time or the energy for anything else!
Second day wrap-up:
- Mariposa Grove
- Glacier Point
- Sentinel Dome
- Half Dome
Traveling soon? Get your Holafly eSIM with a 5% discount for unlimited internet access in any destination. No more worrying about roaming charges or finding local SIM cards. Enjoy unlimited data and stay connected with ease. Order your Holafly eSIM now »
Heymondo offers a wide range of travel assistance insurance policies. They combine the best quality, service and price with various levels of coverage, so you’re covered on your weekend getaways and long trips. Buy insurance »
Do you want to receive notifications about new offers?